Floor Heating mats of VDE and UL approved
Senphus Floor Heating since 2002,which was found in Jiangyin,Wuxi, developed from the alloy wire factory Chengxin.
Senphus Floor Heating mainly include floor heating mats and floor heating cable.
At present, Senphus floor heating had exported to many countries widely.
Company Unique Feature
1. offer clean,no noise, safe and friendly work environment.
2.Senphus products are various, which include floor heating mats, floor heating cable, all kinds of heating wire, resistance wire, alloy wire, silicone heating pads and water pipe heating cable and so on.
3.The raw materials are produced by Senphus factory. We use the good quality alloy wire to produce floor heating. Our alloy wires are flat,smooth,annealed and bright, chile copper and jinchuan nickel, not like other factory, use the tin-copper or al-mg or copper as the heating wire raw materials.
4. offer zealous and timely service for each customer.
5.develop new relating products to meet different markets request and seek high quality.
Birth and Developing of company
Senphus was found in 2002, at the beginning, it is the alloy wire factory in jiangyin, the boss, Mr Cao leads the whole sales department and developed more than 1000 customers of guangdong province in one or two years, and these customers are mainly resistor,floor heating, heating wire, heating pads factory. In the communition with floor heating customers, the boss Mr Cao find the huge potential markets for floor heating in North of China.Then found the floor heating factory and set the foreign department and engineer department. We have 6 foreign salesman and one export manager, 8 experienced engineers.
Developing Target
Senphus's final target, developing 1000 agencies in the whole world.
Procedure of Practice
Do all European or North America or Oceania certificate in one or two years, such as CE,VDE,GS,UL,CUL,SAA etc
Make the long term cooperation customers as the area agency or respective with better price.
Floor Heating Specification
| Voltage |
Size |
Square meters |
Power/W |
Resistance |
Length(m) |
| 230V |
SHDN-160-0.5M2(P) |
0.5 |
80 |
661.3 |
5.55 |
| 230V |
SHDN-160-1M2(P) |
1 |
160 |
330.6 |
11.1 |
| 230V |
SHDN-160-1.5M2(P) |
1.5 |
240 |
220.4 |
16.65 |
| 230V |
SHDN-160-2.0M2(P) |
2 |
320 |
165.3 |
22.2 |
| 230V |
SHDN-160-2.5M2(P) |
2.5 |
400 |
132.3 |
27.75 |
| 230V |
SHDN-160-3.0M2(P) |
3 |
480 |
110.2 |
33.3 |
| 230V |
SHDN-160-3.5M2(P) |
3.5 |
560 |
94.5 |
38.85 |
| 230V |
SHDN-160-4.0M2(P) |
4 |
640 |
82.7 |
44.4 |
| 230V |
SHDN-160-4.5M2(P) |
4.5 |
720 |
73.5 |
49.95 |
| 230V |
SHDN-160-5.0M2(P) |
5 |
800 |
66.1 |
55.5 |
| 230V |
SHDN-160-5.5M2(P) |
5.5 |
880 |
60.1 |
61.05 |
| 230V |
SHDN-160-6M2(P) |
6 |
960 |
55.1 |
66.6 |
| 230V |
SHDN-160-7.0M2(P) |
7 |
1120 |
47.2 |
77.7 |
| 230V |
SHDN-160-8.0M2(P) |
8 |
1280 |
41.3 |
88.8 |
| 230V |
SHDN-160-9.0M2(P) |
9 |
1440 |
36.7 |
99.9 |
| 230V |
SHDN-160-10.0M2(P) |
10 |
1600 |
33.1 |
111 |
| 230V |
SHDN-160-12.0M2(P) |
12 |
1920 |
27.6 |
133.2 |
 Floor Heating Installation Guide1.Divide the floor into a series of rectangles. From these measurements you can calculate how many mats you'll need and what sizes. Exclude permanent or static fixtures from your calculations. If the floor is self-levelling compound over concrete.
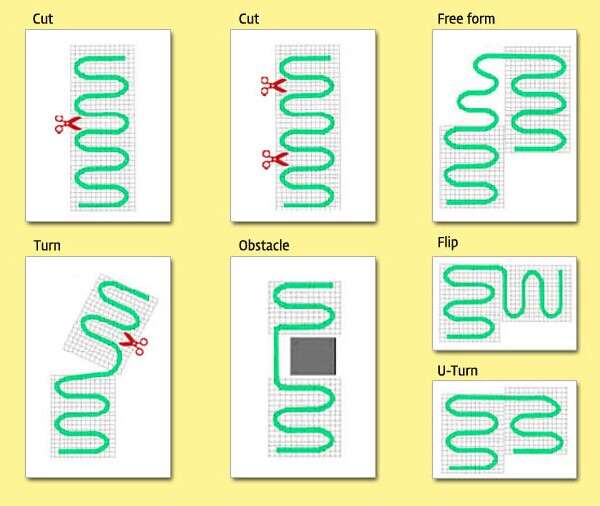
2.Lay the first run. At the end of the run cut the mat leaving the cable intact, turn the mat through 90 or 180 degrees and continue laying. When the area is covered, adjust the mat until the loops are equal distance apart. Now stick the mat to the sub floor using the special tape bands.
3.Lay the temperature probe from the programmable thermostat onto the floor centered between two of the cable loops and secure it to the floor surface. Now take the unheated power lead from the end of the matting system which should be positioned near the thermostat. Refer to the installation manual for testing instructions and readings.
4.Either lay a thin, self-levelling compound over the mat and leave it to dry before laying tiles or trowel flexible tile adhesive directly over the mat and lay the floor tiles. Once the grouting is complete let the tile adhesive cure before switching on the system.


 Company Profile